

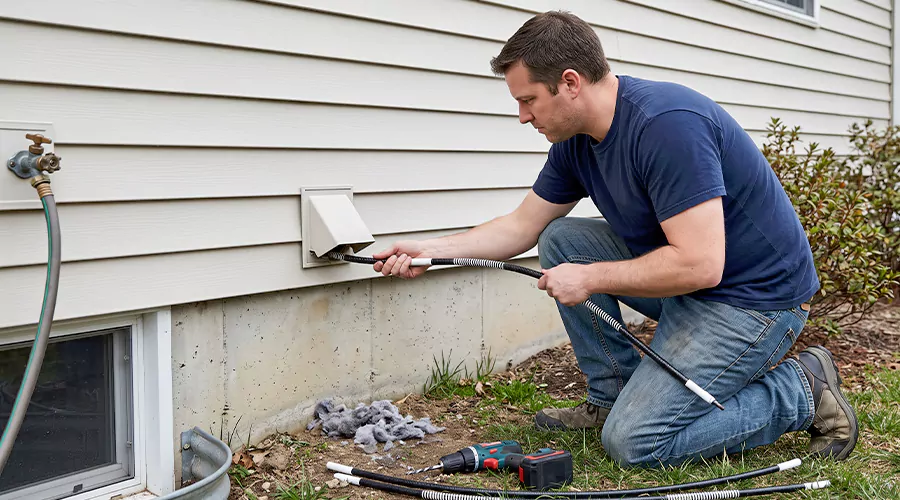
You can clean a dryer vent with a snake by inserting a flexible dryer-vent cleaning brush into the exhaust duct and gradually advancing it to loosen accumulated lint. The loosened material should be collected with a vacuum, and the outdoor vent must be checked before reconnecting the dryer. Use a cleaning tool designed specifically for dryer exhaust rather than an ordinary plumbing snake.
Dryer vents carry warm, moisture-laden air and loose fabric fibers from the appliance to the outdoors. Although the lint screen captures much of the material released during a drying cycle, fine particles continue through the exhaust passage. Over time, these particles can collect along the duct walls and around bends, reducing the amount of air that can escape.
A flexible dryer vent cleaning snake helps reach deposits that are beyond the range of an ordinary vacuum attachment. Some models use a manually operated brush, while others connect to a drill for controlled rotation. Both methods require care because excessive force can damage thin duct material or leave a cleaning attachment trapped inside the exhaust.
The goal is to remove lint while keeping the duct structurally sound. A cleaning snake is useful for certain accessible metal exhaust systems, but it cannot fix a crushed duct or restore a disconnected joint. Knowing when to use the tool and when to stop can prevent a routine cleaning job from becoming a larger repair.
What Is a Dryer Vent Cleaning Snake?
A dryer vent cleaning snake is a flexible tool designed to reach lint inside a dryer exhaust duct. Most household kits use a cylindrical brush attached to flexible extension rods. The rods bend gradually to follow a suitable vent route while the brush loosens deposits from the interior surface.
Some people use the word snake to describe any long tool inserted into a duct. However, a dryer vent cleaning snake is different from the metal cable auger used to clear household drains. Plumbing snakes are intended for pipe obstructions and may have sharp or aggressive ends that can damage dryer exhaust ducting.
A dryer-specific brush is generally better suited to removing lint because its bristles contact the duct walls without using a cutting head. Brush diameter and rod flexibility should match the vent. A tool that is too large or too stiff may become trapped at an elbow.
Manual Dryer Vent Snakes
A manual cleaning snake uses flexible rods or a long brush that is advanced by hand. It is often suitable for short, accessible vents with relatively gentle bends. The user moves the brush slowly through the duct to loosen accumulated fibers.
Manual operation offers direct control over how much force is applied. However, it may be difficult to reach long concealed sections. A heavily obstructed duct can also require more than repeated hand brushing.
Drill-Powered Dryer Vent Snakes
A drill-powered kit uses an adapter that connects the flexible rods to a compatible drill. Rotation helps the brush loosen lint while it moves through the exhaust passage. Many kits specify clockwise rotation so their threaded rods remain connected.
The exact operating direction and speed must follow the cleaning kit manufacturer's instructions. Reversing a threaded rod assembly can cause the sections to unscrew inside the duct. Excessive speed or force may also damage the duct or cleaning attachment.
Professional Dryer Vent Cleaning Cables
Professional equipment may use longer flexible cables and specialized brush heads. These systems can reach some ducts that are difficult to clean with ordinary household rods. However, longer reach does not automatically make a tool suitable for every exhaust configuration.
Professionals often assess the duct route before selecting their equipment. Tight elbows and damaged connections can increase the chance of a cable becoming stuck. The condition of the passage determines whether brushing is appropriate.
When Should You Use a Dryer Vent Snake?
A dryer vent snake is useful when accumulated lint is restricting an otherwise sound exhaust duct. It works best when the duct route is known and the material can tolerate the cleaning brush. Short or moderately long smooth metal passages are often suitable when both ends can be accessed.
A snake is less suitable when the duct is severely crushed or contains an obstruction that cannot be identified. The tool should not be used to force a path through a disconnected joint. Doing so can push debris into a wall cavity or damage the connection.
| Vent Condition | Is a Dryer Vent Snake Suitable? | Recommended Response |
|---|---|---|
| Light lint inside sound metal duct | Usually yes | Brush and collect debris |
| Moderate buildup in accessible duct | Often yes | Use compatible cleaning kit |
| Long duct with several bends | Depends on tool and route | Consider professional cleaning |
| Crushed transition hose | No | Replace damaged hose |
| Plastic or fragile foil-style duct | Not recommended | Replace unsuitable material |
| Disconnected concealed duct | No | Repair connection first |
| Heavy obstruction that stops the brush | No further force | Investigate blockage |
| Roof termination needing inspection | Limited indoor access only | Arrange safe professional access |
A brush can remove lint from a sound passage, but it cannot make a damaged installation safe. If the duct material is unsuitable or the exhaust route violates the dryer's installation requirements, replacing or correcting the affected section may be necessary.
What Tools Do You Need to Snake a Dryer Vent?
A dryer vent cleaning kit is the main tool required for this method. Other supplies help collect loosened lint and restore the exhaust connection afterward. Gather everything before disconnecting the dryer so the vent does not remain open longer than necessary.
Useful supplies include:
- Dryer-specific flexible cleaning brush and extension rods
- Compatible drill, if the kit is designed for powered rotation
- Vacuum with hose and crevice attachment
- Screwdriver or nut driver for accessible clamps
- Flashlight
- Work gloves and suitable eye protection
- Container or bag for collected lint
- Replacement approved connection clamp if needed
- Dryer manufacturer's maintenance instructions
A drill is optional when the cleaning kit supports manual use. Not all brush systems are designed to rotate with power tools. Do not improvise an adapter or connect a plumbing snake to a drill.
Inspect the brush and each extension rod before starting. A cracked connector or loose brush head can separate inside the duct and create a blockage. Worn components should be replaced rather than used for another cleaning.
How to Clean a Dryer Vent With a Snake Step by Step?
Cleaning a dryer vent with a snake involves accessing the exhaust and moving a compatible brush through the passage in controlled stages. The dryer must remain disconnected from electrical power during cleaning. The method below applies to a conventional vented dryer with a sound, accessible metal exhaust system.
Step 1. Turn Off and Unplug the Dryer
Switch off the dryer and allow it to cool before performing maintenance. Unplug the appliance from its electrical supply so it cannot start while the exhaust connection is open. Remove accumulated lint from the screen before handling the duct.
Gas dryers require special caution. Moving the appliance can strain its gas connection, and an accidental leak is a much more serious problem than a dirty vent. If accessing the exhaust requires disconnecting or stretching the gas line, arrange qualified service instead of moving the dryer yourself.
Step 2. Identify the Exhaust Route
Locate the transition duct connecting the dryer outlet to the permanent exhaust pipe. Determine where the duct terminates outdoors and whether the passage contains several bends. Knowing the approximate route helps you choose a suitable brush length.
Check whether the termination is through a wall or roof. A roof vent may require professional access even when some of the duct can be reached from the laundry room. Do not assume that a long cleaning rod will reach or clear the exterior damper.
Step 3. Inspect the Transition Duct
Look for crushing or excessive bending behind the dryer. A compressed transition duct can restrict airflow even when no lint buildup is present. Inspect the material for tears or signs of separation at the fittings.
The transition duct should be listed for dryer use and installed according to the appliance manufacturer's instructions. A severely damaged or unsuitable hose should be replaced rather than aggressively brushed. Flexible transition materials can be easier to damage than rigid metal exhaust pipe.
Step 4. Disconnect the Accessible Duct Connection
If the connection can be reached safely, loosen the appropriate clamp and separate the transition duct from the permanent exhaust. Support the connection so the material does not tear as it is removed. A photograph of the original arrangement may help with proper reassembly.
Do not pull on the duct itself to release a tight connection. This can damage the fitting or loosen a concealed joint in the wall. If the connection cannot be separated without substantial force, stop and use an appropriate service method.
Step 5. Vacuum Lint Near the Opening
Use a vacuum hose to collect visible lint from the exposed duct entrance. Remove loose deposits before inserting the brush so they are not pushed deeper into the passage. A flashlight can help reveal debris or damage near the opening.
If the opening contains heavy nesting material or an unidentified obstruction, do not force a snake through it. Such material may require a different removal method. Clearing the blockage safely is more important than getting the brush through the duct.
Step 6. Assemble the Dryer Vent Snake
Attach the brush head securely to the first flexible rod. Check that the connector is properly seated and that the brush size is suitable for the duct. For a drill-powered kit, attach the adapter according to the tool instructions.
Confirm the required rotation direction before using the drill. Many threaded kits call for clockwise rotation and prohibit reversing. Follow the actual product instructions because the way rods connect can vary between manufacturers.
Step 7. Insert the Brush Slowly
Guide the brush into the metal exhaust opening and advance it gradually. Use gentle movement so the bristles contact the duct walls without excessive force. The brush should follow the passage rather than scrape aggressively against fittings.
Stop if the tool meets unexpected resistance. A sudden obstruction may indicate a tight elbow or damaged section. Forcing the brush can separate rods or damage concealed duct connections.
Step 8. Clean in Short Sections
Move the brush back and forth over short sections to loosen deposited lint. A drill-powered brush should rotate only at the setting permitted by the kit manufacturer. Avoid sudden changes in direction or high-speed operation that makes the tool difficult to control.
As you reach the end of an extension rod, stop before attaching another section. Confirm that the existing connections remain secure. Extend the tool gradually rather than assembling an excessively long flexible shaft that is difficult to guide.
Step 9. Withdraw the Brush Carefully
Once the reachable section has been cleaned, withdraw the brush slowly. If using a drill-powered kit, maintain the rotation direction required by the manufacturer when instructed. Reversing rotation can unscrew threaded sections and leave the brush inside the duct.
Watch for lint collecting around the brush as it returns. Remove the debris and continue collecting loose material with the vacuum. Do not assume the passage is completely clean simply because the brush has reached its maximum extension.
Step 10. Clean the Exterior Termination
Inspect the outdoor exhaust opening from a safe location. Remove reachable lint from around the damper while the dryer remains off. Confirm that the termination is not blocked by debris or nesting material.
A dryer exhaust termination should have a functioning damper without a lint-trapping screen. If the vent exits through the roof, avoid unsafe climbing and arrange professional access where necessary. The upper termination may retain lint even after the main duct has been brushed.
Step 11. Reconnect the Exhaust Duct
Reattach the transition duct with an approved connection method. Make sure the duct is not crushed or sharply bent when the dryer returns to its normal position. Check that the connection remains secure and that no lint is left around the appliance.
Do not use protruding screws that catch lint inside the exhaust passage. The permanent exhaust should remain connected to the outside termination, and the transition section should meet the appliance's installation requirements.
Step 12. Check the Results
After the exhaust has been fully reassembled, restore power and operate the dryer according to its instructions. Check the outdoor vent from a safe location to confirm that the damper opens and exhaust air flows normally. Listen for unusual sounds and watch for signs of overheating.
If airflow remains weak or drying performance does not improve, stop using the dryer until the reason is identified. A cleaning snake may have missed an obstruction farther along the route. A damaged duct or appliance malfunction may also be responsible.
Can You Use a Plumbing Snake to Clean a Dryer Vent?
A conventional plumbing snake should not be used as a substitute for a dryer vent cleaning brush. Drain augers are designed to break through obstructions in plumbing pipes. Their metal cables and cutting heads can damage thinner dryer exhaust ducts or catch on seams.
Dryer vent cleaning tools are intended to loosen lint without cutting into the duct material. Their brushes are also designed to contact a larger portion of the duct wall. This makes them more appropriate for removing fiber deposits from sound metal passages.
The difference is especially important near elbows and transition connections. A plumbing auger can snag the edge of a fitting and place force on a concealed joint. If the duct opens inside a wall, dryer exhaust can later escape into the building cavity.
Choose a cleaning tool specifically rated for dryer exhaust. If a heavy blockage cannot be reached with that equipment, professional inspection is preferable to forcing an unsuitable snake through the passage.
Should You Use a Drill With a Dryer Vent Snake?
A drill can help rotate a compatible dryer vent brush, but it is not necessary for every cleaning. The tool manufacturer must permit drill operation, and the correct rotation direction must be followed. A household drill should not be used with an improvised metal auger.
Drill-powered brushes can loosen lint more effectively on some smooth metal duct surfaces. However, rotation also increases the risk of damage if the brush binds or encounters an unstable joint. Excessive speed can make the tool difficult to control.
Many kits require clockwise rotation throughout insertion and withdrawal. Reversing the drill can loosen threaded rods. Stop the tool before adding extensions and keep all connections secure.
If the brush becomes stuck, do not increase drill power or reverse direction unless the manufacturer specifically instructs you to do so. A trapped tool may require professional removal to avoid further damage.
What Problems Can Occur While Snaking a Dryer Vent?
The main risks involve damaging the exhaust duct or leaving part of the cleaning tool inside it. These problems become more likely when the vent route contains several sharp bends or the duct material is fragile. Improper use can turn an ordinary lint buildup into a more serious blockage.
| Problem | Possible Cause | Appropriate Response |
|---|---|---|
| Brush becomes stuck | Tight bend or obstruction | Stop and assess the duct |
| Extension rods separate | Loose connector or wrong rotation | Avoid further operation and arrange retrieval |
| Thin duct tears | Brush or tool is unsuitable | Repair or replace damaged material |
| Lint remains at exterior hood | Brush did not reach termination | Clean outlet separately |
| Airflow stays weak | Remaining blockage or crushed duct | Inspect full exhaust route |
| Transition hose becomes damaged | Rough handling during removal | Replace with approved material |
An important warning sign is sudden resistance while advancing the brush. The correct response is to stop, not to apply more force. The duct may be disconnected or contain a fitting that the tool cannot safely pass.
How Often Should You Snake a Dryer Vent?
The U.S. Fire Administration recommends cleaning dryer vent ductwork every year. A dryer vent snake may be part of that cleaning when the installation and materials are suitable. However, the frequency of cleaning does not determine which tool should be used.
Homes with long exhaust passages or several bends may need more frequent checks. Heavy laundry use can also increase the amount of lint entering the system. Signs such as unusually long drying cycles should prompt inspection before the next scheduled cleaning.
The lint filter requires much more frequent attention and should be cleaned every load. Regular filter maintenance reduces the amount of material entering the exhaust but does not eliminate buildup inside the permanent duct.
When Should You Call a Professional Dryer Vent Cleaner?
Professional cleaning is appropriate when the exhaust duct is long or concealed and the brush cannot pass through it safely. Roof terminations and substantial obstructions also require care. A trained technician can select equipment suited to the duct's material and configuration.
A professional should also evaluate the system when an extension rod becomes stuck or a concealed joint may have separated. Continuing to operate the dryer with a cleaning tool trapped inside the duct is unsafe. The obstruction must be removed and the duct inspected before normal use resumes.
If the dryer produces a burning smell or repeatedly overheats, stop using it regardless of when the vent was last cleaned. The cause may involve a serious exhaust restriction or an internal appliance problem. Cleaning should not be used as repeated trial-and-error while the dryer continues operating abnormally.
How Can You Prevent Dryer Vent Lint Buildup?
Regular maintenance helps reduce the amount of lint remaining in the exhaust system. Proper duct materials and a direct vent route also make cleaning easier. The main goal is maintaining a clear path for hot, moisture-laden air to leave the building.
Clean the Lint Screen Every Load
Remove accumulated fibers before or after every drying cycle. Inspect the screen for damage and residue that may reduce airflow through its mesh. Follow the manufacturer's instructions when deeper filter cleaning is necessary.
Keep the Exhaust Duct Properly Routed
Avoid crushed transition ducts and unnecessary sharp bends. A smooth metal exhaust provides fewer places for lint to collect than unsuitable corrugated materials. Any installation changes should follow the dryer manufacturer's requirements and applicable building codes.
Inspect the Outdoor Damper
Check that the exterior flap opens during normal dryer operation and closes afterward. Remove visible lint from around the opening when the appliance is off. Do not install mesh screening across the termination because it can collect fibers.
Schedule Regular Cleaning
Plan a full exhaust cleaning approximately once a year or sooner when performance declines. Record the cleaning date and any observed restrictions. Repeated heavy buildup may indicate that the duct route or termination needs repair.
Conclusion
Cleaning a dryer vent with a snake can remove lint from accessible metal exhaust ducts when the correct brush and technique are used. A dryer-specific cleaning kit is safer for the task than an ordinary plumbing auger. The brush should be advanced gently, and loosened material must be collected rather than pushed farther into the system. Difficult bends and roof vents may require professional service. Before starting, identify your vent route and confirm that the cleaning tool is compatible with the duct.